7 Small Bathrooms That Use Statement Tiles Perfectly (steal-worthy Ideas)
Your tiny bathroom isn’t the problem. Your tiles are. Bold, gutsy statement tiles can flip a tight space from “meh” to “OMG whose bathroom is this?” in one weekend. The trick is knowing where to splash the drama and where to keep it chill.
Let’s tour seven small bathrooms that nailed it—plus how to copy the look without crying over grout lines.
1. The Floor-Only Flex: Let Your Feet Do The Talking
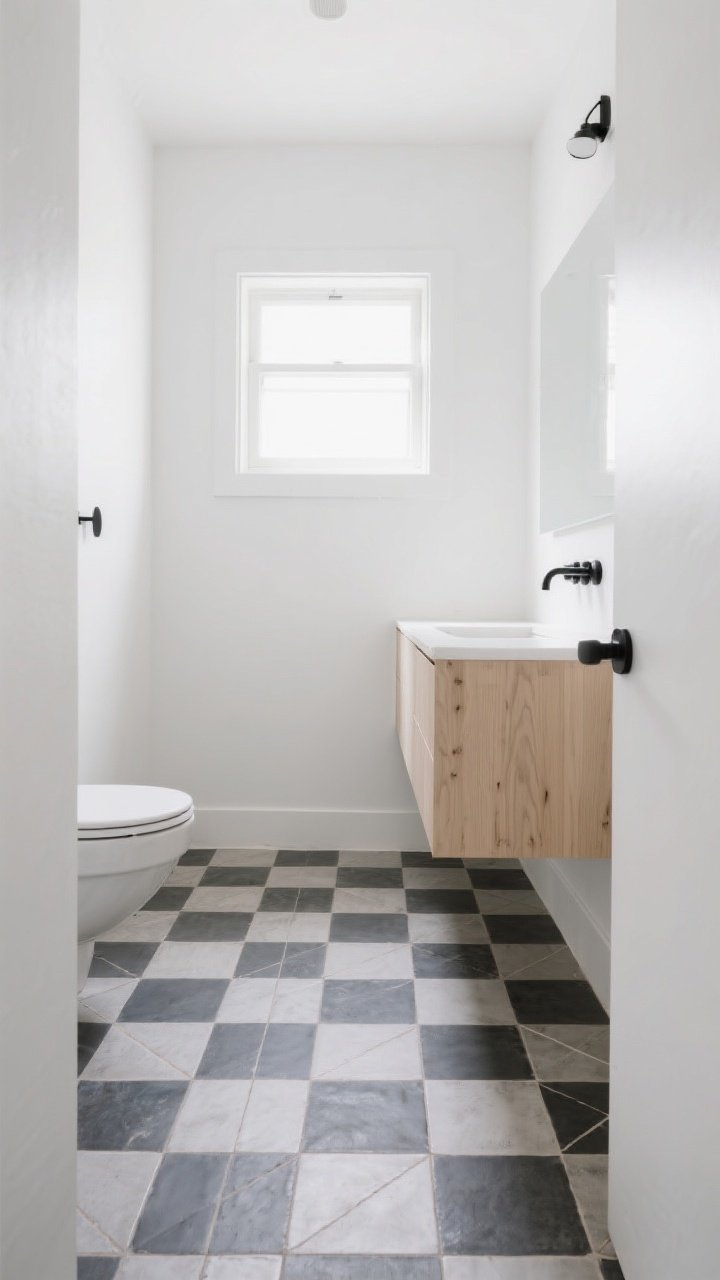
When square footage is limited, the floor is your runway. A patterned tile underfoot draws the eye across the space and makes it feel bigger (sneaky, right?). Keep the walls simple so your floor stays the star.
Why It Works
- Visual flow: A continuous, graphic floor pattern elongates the room.
- Easy balance: Neutral walls + bold floor = instant harmony.
- Low risk: Floor tiles feel daring without overwhelming the mirror view.
How To Steal It
- Pick encaustic-look or geometric porcelain in 8×8 or 6×6 for punch.
- Use light grout for busy patterns, dark grout for simple geometrics.
- Pair with white walls, a simple vanity, and matte black hardware.
Pro tip: Run the tile straight (not diagonal) to avoid visual chaos. Your future self says thanks.
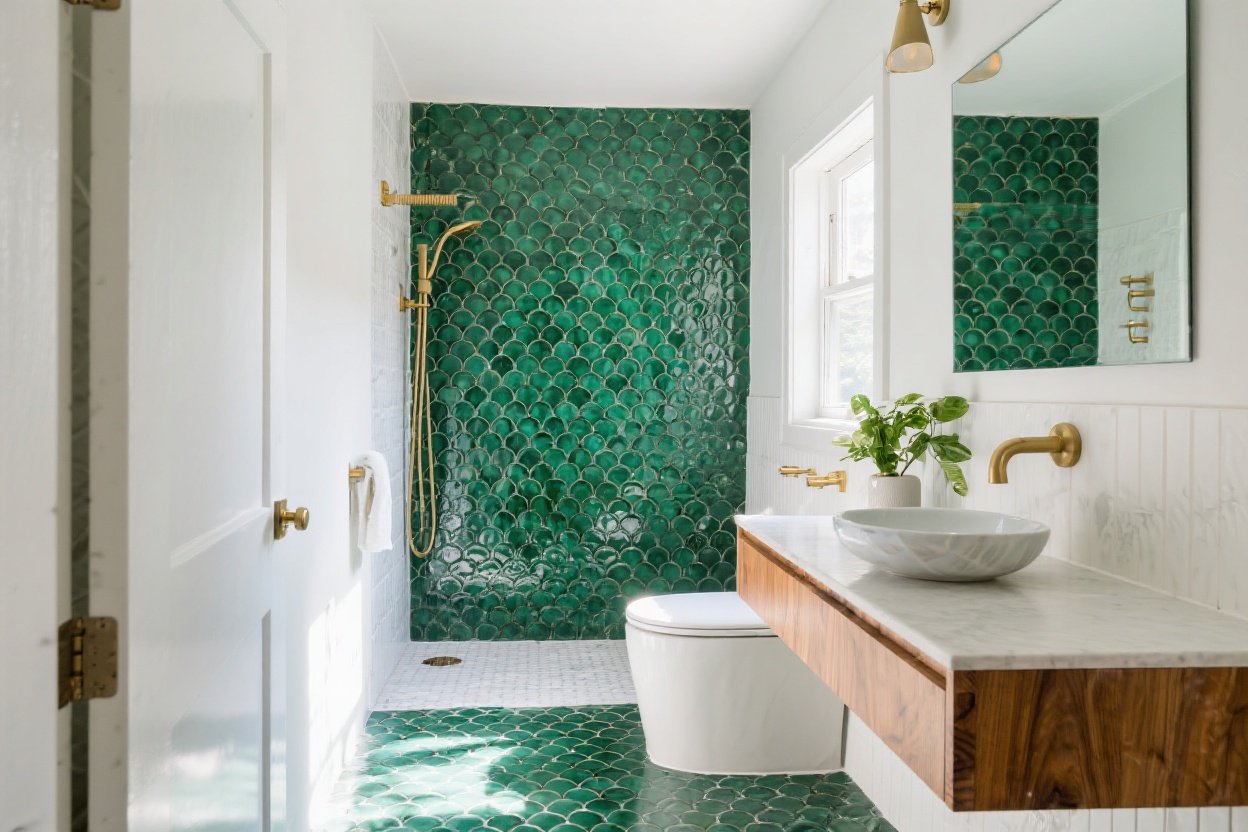
2. The Shower Stunner: One Wall, All Drama
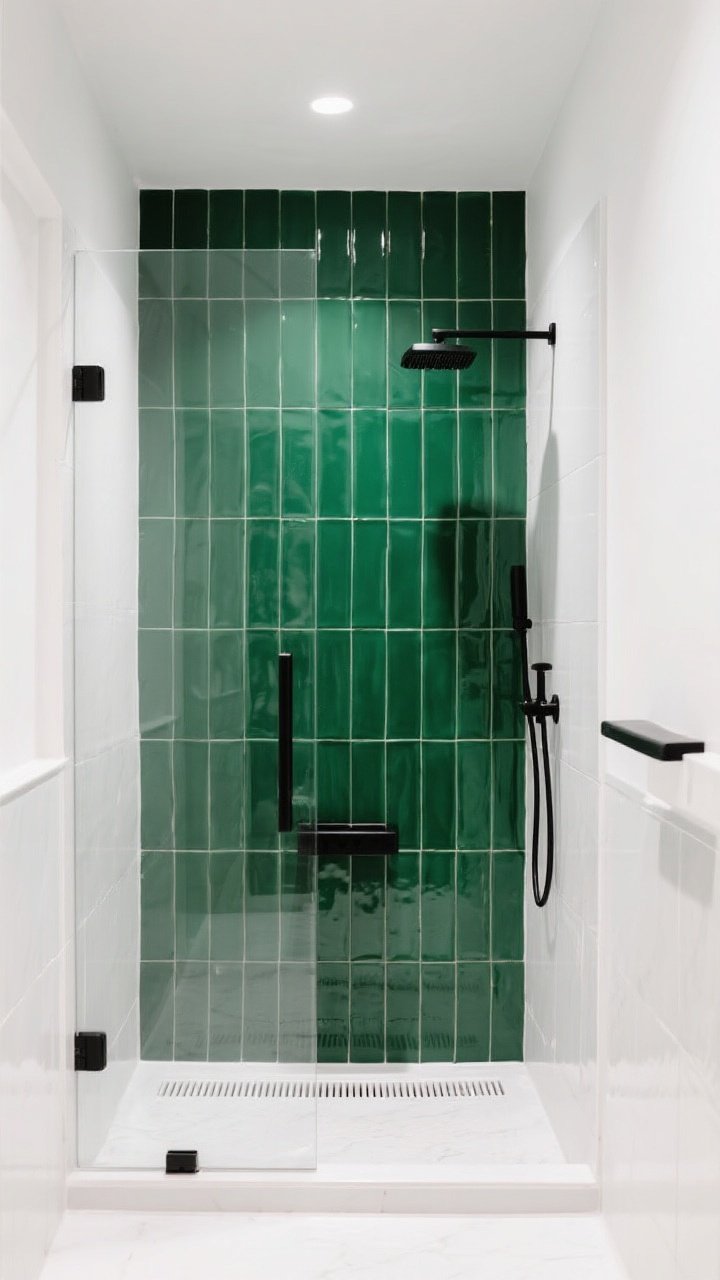
Statement tile in the shower turns a cramped bath into a boutique spa moment. Pick one wall—usually the back wall—and go all in with a pattern or color that demands attention.
Why It Works
- Focal point: Your eye goes to the far wall, making the shower feel deeper.
- Splash zone approved: High-impact, high-function area. Win-win.
- Glass doors: If you have them, they act like a display case for your artful tile.
How To Steal It
- Choose a waterproof, low-maintenance porcelain with a bold pattern or rich color.
- Keep side walls plain (think white or soft gray) for contrast.
- Use vertical stack bond or herringbone for extra height.
FYI: Tile to the ceiling. Stopping mid-wall shrinks the space, and we’re not doing that today.
3. The Half-Wall Hero: Wainscot With Wow
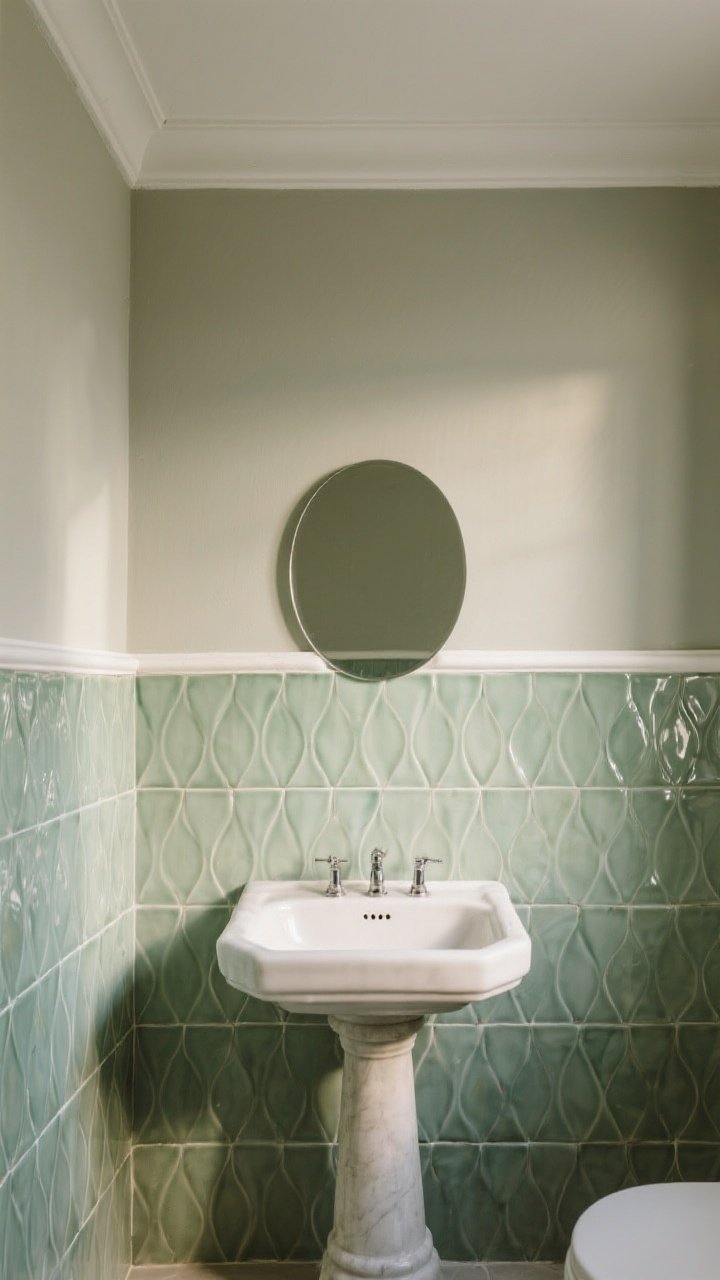
Love pattern but fear commitment? A statement tile wainscot (half wall) lets you flex style and keep the upper wall breezy. It’s old-school technique with modern swagger.
Why It Works
- Balance: Pattern below, paint above = airy but interesting.
- Budget-friendly: Less tile, same impact.
- Protects walls: Splash-proof around the sink and toilet.
How To Steal It
- Run tile to 36–42 inches high; cap with a clean bullnose or slim wood trim.
- Try glossy zellige-style tiles for texture and light bounce.
- Top with a soft, contrasting paint (sage, blush, or greige = chef’s kiss).
Bonus move: Echo the tile color in a hand towel or art so it feels intentional, not random.
4. The Vanity Splash Zone: Go Big On The Backsplash
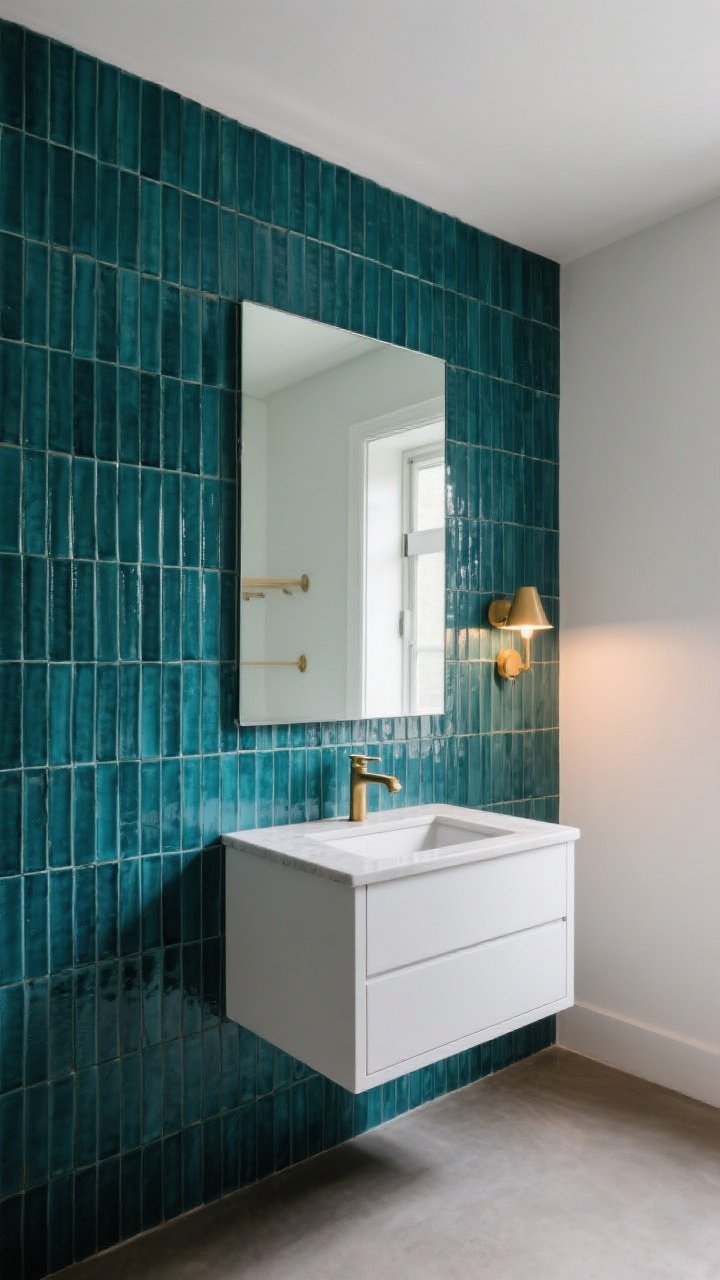
A floor-to-mirror (or ceiling!) backsplash behind the vanity delivers drama without tiling the entire room. It frames your mirror like jewelry and makes the vanity feel custom.
Why It Works
- Vertical drama: Tall tile stacks trick the eye into reading “taller ceiling.”
- Practical: Toothpaste wars? No worries—wipe and done.
- Budget smart: Smaller area, higher-end tile = luxe without the full splurge.
How To Steal It
- Pick a mosaic or skinny stack in a bold hue—teal, oxblood, or emerald wins.
- Run tile behind the mirror for a built-in look.
- Use dimensional or handmade-look tiles to bounce light in tight spaces.
IMO: If you go glossy here, keep the floor matte for slip safety and balance.
5. The Niche With Main-Character Energy
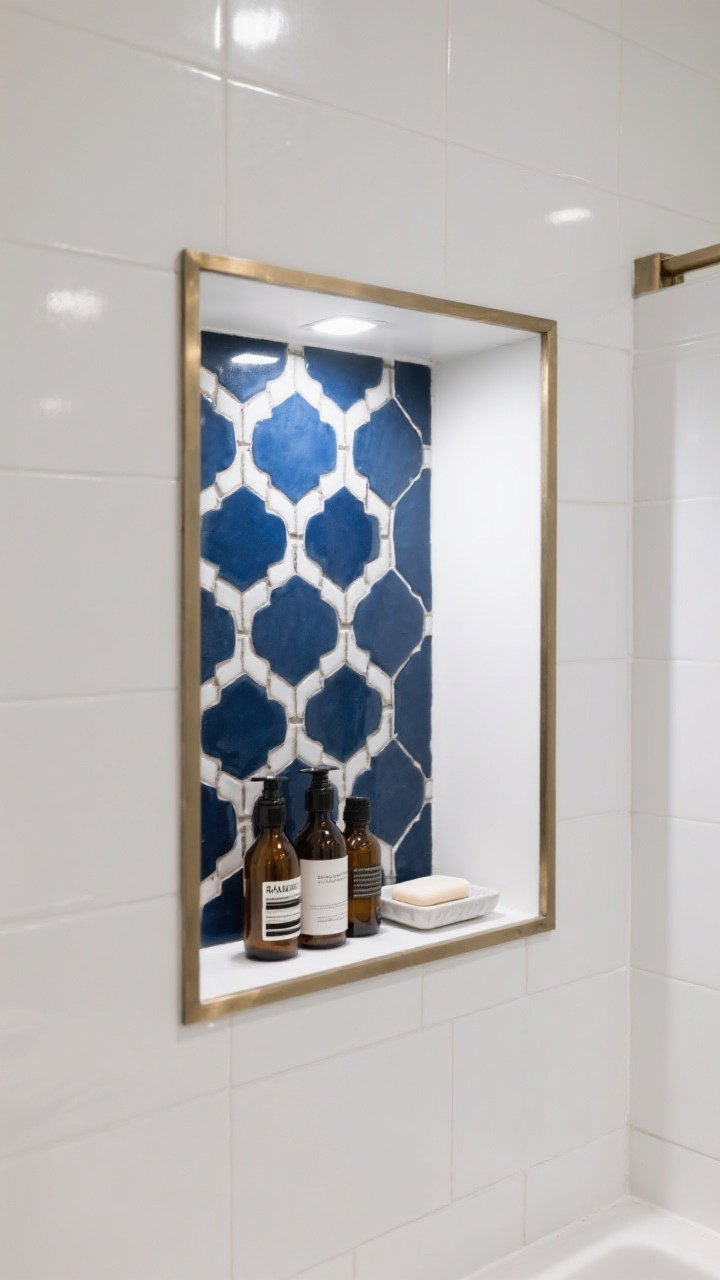
Got a shower niche? Make it your show-off moment. A contrasting tile inside the niche creates a micro-gallery that draws attention without taking over the room.
Why It Works
- Tiny footprint, huge payoff: Minimal materials, maximum style.
- Depth illusion: Contrast inside the niche makes walls feel layered.
- Custom vibes: Looks designer without a designer price tag.
How To Steal It
- Choose a patterned mosaic or metallic glass tile inside the niche.
- Outline with a slim metal trim (brushed brass or black) for a crisp frame.
- Repeat the niche tile in a small accent (soap dish, art) for cohesion.
Pro tip: Align niche height with grout lines so everything looks intentional and clean.
6. The Monochrome Mood: One Color, Many Textures

Not all statement tiles shout. Some smolder. A tight color palette with varied textures and shapes—think glossy subway, matte hex, and ribbed accents—creates depth without visual noise.
Why It Works
- Cohesion: One hue keeps small rooms calm.
- Interest: Texture and shape do the heavy lifting.
- Timeless: Easier to live with than loud patterns—great for long-term value.
How To Steal It
- Pick a base color (e.g., ink blue or warm white) and mix two tile shapes.
- Use contrasting sheens (matte floor, gloss wall) for light play.
- Keep grout tone-on-tone to elongate surfaces and feel luxe.
FYI: Dim-to-bright lighting will hit those textures differently, so test samples under your actual lights.
7. The Ceiling Surprise: Look Up And Gasp
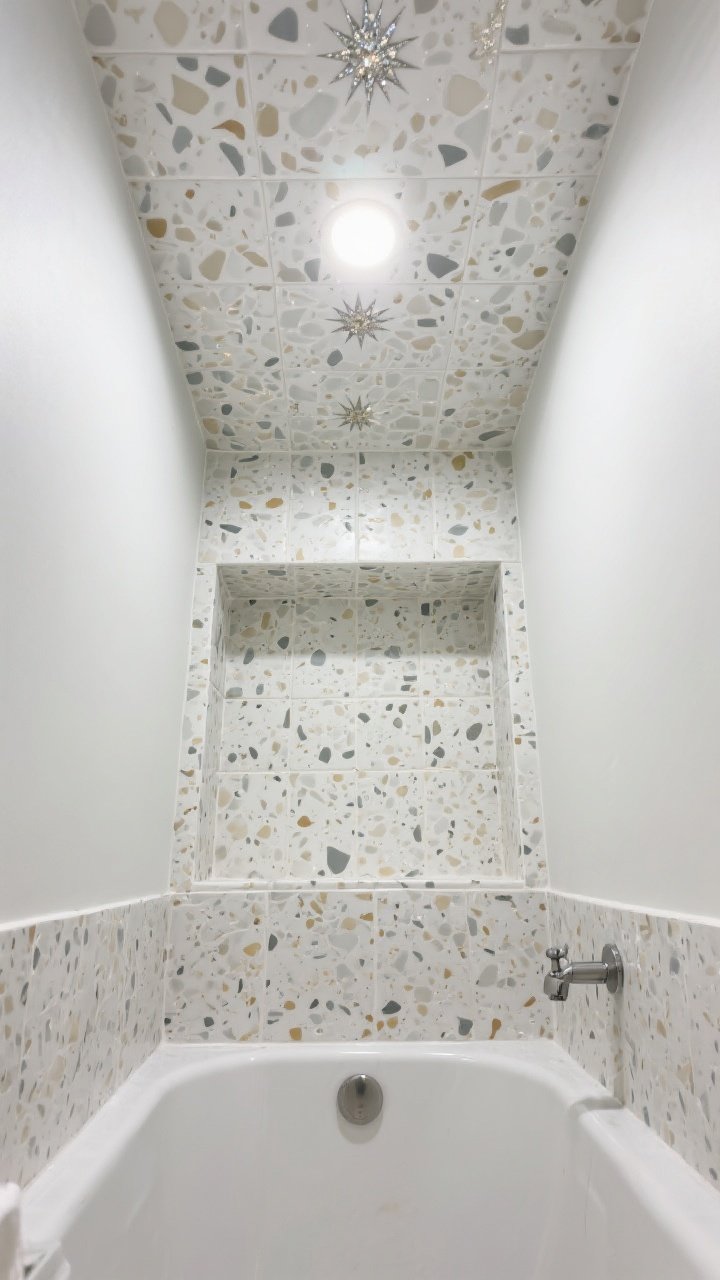
Yes, you can tile the ceiling. In a small bath, a patterned or colored tiled ceiling turns the whole room into a jewel box—especially above a shower or soaking tub.
Why It Works
- Unexpected: Guests look up, then ask for your contractor’s number.
- Cocoon effect: Enveloping vibe makes small spaces feel intentional, not cramped.
- Moisture armor: Practical in steamy zones when properly installed.
How To Steal It
- Pick lightweight porcelain or mosaic sheets for easier overhead install.
- Mirror the ceiling tile sparingly on the floor or niche to tie it together.
- Use a waterproof membrane and high-quality thinset; gravity is not your friend.
Hot take: A subtle starburst or terrazzo-look mosaic overhead is iconic without feeling circus-y.
Quick Tile Shopping Checklist
- Slip resistance: Floor tiles should be rated for wet areas (look for DCOF ≥ 0.42).
- Maintenance: Porcelain = low maintenance. Natural stone = reseal regularly.
- Scale: Smaller rooms love smaller tiles or tight patterns—fewer awkward cuts.
- Grout color: Match for seamless, contrast for graphic. Seal your grout, always.
- Lighting: Warm LEDs make cool tiles cozy; bright white can go clinical fast.
Layout + Install Tips
- Dry lay first: Test pattern direction and alignment with main sight lines.
- Center the pattern: Avoid slivers at edges; adjust starting point to frame the room.
- Mind the transitions: Use metal schluter trims for clean edges at drywall or different materials.
- Ventilation matters: A good fan keeps grout happy and mold away.
Color Pairings That Never Miss
- Emerald + Brass + Warm White: Glam but grounded.
- Charcoal Hex + Natural Oak + Soft Linen Paint: Modern organic.
- Terracotta Zellige + Cream + Black Accents: Mediterranean cozy.
- Navy Penny Round + Polished Nickel + Crisp White: Nautical chic without the anchors.
Budget Saver: Use the hero tile in a smaller zone (niche, backsplash) and surround with affordable field tile. No one will know, and we won’t tell.
Common Mistakes To Avoid
- Too many stars: One statement moment per small bath, maybe two if they’re subtle.
- Ignoring grout width: Wider grout = busier look. Most patterns love 1/16″–1/8″.
- Skimping on prep: Unlevel floors or walls = sad patterns. Fix substrates first.
- Forgetting storage: A sassy tile won’t hide your shampoo avalanche—add shelves or a vanity with drawers.
Bottom line? Small bathrooms are the perfect playground for statement tiles. Pick your moment, balance it with calm surfaces, and let the pattern do the heavy lifting. You’ll get big-style energy in a tiny footprint—and bragging rights every time someone asks, “Who designed this?”
Now go choose your tile crush and make your bathroom the most screenshot-worthy room in the house.